网上早就有很多帝国cms 的百度推送插件,但是不能达到本人的要求,所以2017年高考放假这几天,自己写了一个,用着还不错,分享出来。
【准备】登录百度站长平台,左侧菜单,网页抓取,链接提交,获取准入秘钥。
接口调用地址: http://data.zz.baidu.com/urls?site=www.zhongyf.com&token=f7Kxx***XnbHaikU
| 参数名称 | 是否必选 | 参数类型 | 说明 |
|---|---|---|---|
| site | 是 | string | 在站长平台验证的站点,比如www.example.com |
| token | 是 | string | 在站长平台申请的推送用的准入密钥 |
| type | 否 | string |
对提交内容的数据类型说明, 原创数据参数:original, 请提交真实原创内容 |
【安装步骤】
1.在后台建立一个名称为p2b的扩展变量,选写入缓存。内容为:
此处隐藏543个字。
阅读需要
其中各个参数的含义,下文介绍。
2.修改帝国cms之代码/e/class/userfun.php,添加以下两个函数:
//jiuhecaipush2baidu
function checkBaiduInclude($url){
  $url='http://www.baidu.com/s?wd='.$url;
 $curl=curl_init();
 curl_setopt($curl,CURLOPT_URL,$url);
 curl_setopt($curl,CURLOPT_RETURNTRANSFER,1);
 $rs=curl_exec($curl);
 curl_close($curl);
 $rs=mb_convert_encoding($rs,"GBK","UTF-8");  // utf8网站注释掉这句
 if(strpos($rs,'抱歉,没有找到')  or strpos($rs, '有找到该URL')){
 return 0;
 }else{
 return 1;  }
}
function push2baidu($url){
 global $public_r;
 //$p2b_sets=include('../extend/push2baidu/config.php');
 //$p2b=empty($public_r['add_push2baidu'])?0:1;
    eval($public_r['add_p2b']);
 //$p2b=$p2b || $p2b_sets['push2baidu'];
 if(!$p2b_sets['push2baidu'])return '';
 $url=str_replace(ECMS_PATH,'',$url);
$url=str_replace('../../','',$url);
 foreach($p2b_sets['disallow'] as $disallowpath){
  if(strpos('/'.$url,$disallowpath)===0)return '';
 }

 $domain=$p2b_sets['domain']?$p2b_sets['domain']:$_SERVER['HTTP_HOST'];
 $url='http://'.$domain.'/'.$url;
 if($p2b_sets['checkBeforePush']){
  if(checkBaiduInclude($url))return '';

 }

 $urls[]=$url;
 $api = 'http://data.zz.baidu.com/urls?site='.$domain.'&token='.$p2b_sets['token'];
 $ch = curl_init();
 $options =  array(
  CURLOPT_URL => $api,
  CURLOPT_POST => true,
  CURLOPT_RETURNTRANSFER => true,
  CURLOPT_POSTFIELDS => implode("n", $urls),
  CURLOPT_HTTPHEADER => array('Content-Type: text/plain'),
 );
 curl_setopt_array($ch, $options);
 $result =json_decode(curl_exec($ch),true);

 if($p2b_sets['insert_dolog']){
  if(isset($result['error'])){
   $doing='push2baidu#error#'.$result['message'].'#'.$url;
  }else{
   $doing='push2baidu#success#'.$result['remain'].'#'.$url;
  }
  insert_dolog($doing);
 }
}
3.修改 e/class/connect.php中的函数WriteFiletext,在该函数倒数第一行前插入
//jiuhecaipush2baidu
if(function_exists('push2baidu'))push2baidu($filepath);
修改后是这样的
//写文件
function WriteFiletext($filepath,$string){
 global $public_r;
 $string=stripSlashes($string);
 $fp=@fopen($filepath,"w");
 @fputs($fp,$string);
 @fclose($fp);
 if(empty($public_r[filechmod]))
 {
  @chmod($filepath,0777);
 }

//jiuhecaipush2baidu
 if(function_exists('push2baidu'))push2baidu($filepath);
}
至此,插件安利完成,可以使用了。
【参数设置】
array(
    'domain'=>'www.zhongyf.com', //主机域名,不带http://,结尾不带/,为空则取$_SERVER['HTTP_HOST']
    'token'=>'f7Kxx***XnbHaikU', //百度站长平台分配的密钥
    'push2baidu'=>1, // 默认为1,执行推送;为0关闭本插件
    'checkBeforePush'=>0, // 默认为1,推送前检查是否已经收录,已经收录的话就不推送了
    'insert_dolog'=>1, // 默认为1,推送结果保存到系统日志
    'disallow'=>array(  // 如果文件属于这些目录则不推送
         '/d/','/e/class/','/e/config/','/e/enews/','/e/update','/e/data/'
         )
  );
注意,不要把注释带入缓存变量。
【推送功能】
发布首页
发布一篇文章,自定义内容页,包括分页
发布列表页,自定义列表页,包括各分页
发布信息tags
发布专题
只要你生成文件
就自动提交到百度,不需要手动点击

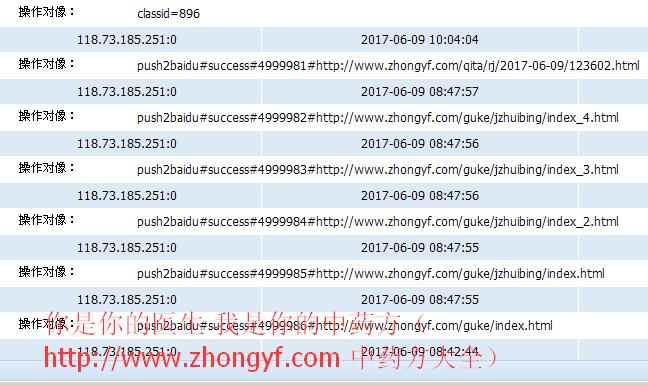
可以在后台- 用户面板 - 管理操作日记 里看到推送记录。推送后,本篇文章马上就收录了。
进化史:
1.首页,列表页不推送的处理
if(preg_match('//index_d+.html/i',$url))return ''; //列表分页不推
if(preg_match('//d+_d+.html/i',$url))return ''; //内容分页不推
2. 2021年11月14日
修正bug, 伪静态页面也可以推送
可以多端推送
